
NxFilter for PC is a feature-rich, free DNS filtering software designed for Windows users. Once installed, it runs as a DNS proxy server, monitoring and filtering network traffic to ensure your online environment remains safe. The software boasts excellent filtering capabilities, effectively blocking traffic from malware and botnets. By inspecting DNS packets, it identifies and intercepts potential threats, protecting your devices from malicious attacks and data breaches.
Furthermore, NxFilter offers flexible filtering options and configurations. Users can manage settings through a web-based interface to set global or user-specific filtering rules. It also supports importing users and groups from Active Directory, allowing for more granular management by applying multiple policies based on specific users or groups.
Software Features
1. Faster and Lighter
NxFilter only needs to filter DNS queries on the network, which means there is almost no lag. It is extremely lightweight compared to using a traditional web proxy server.
2. Highly Scalable
NxFilter is used by ISPs, DNS filter providers, schools, hospitals, and other large enterprises, backed by years of real-world performance experience.
3. High Stability
NxFilter is very stable and does not require frequent restarts. Many users run it for months at a time, usually only restarting when applying software updates.
4. Local DNS Caching
NxFilter caches DNS responses from its upstream servers. Users receive answers locally through the NxFilter cache, which significantly reduces overall DNS traffic on your network.
5. User Authentication
You can protect your network by requiring user authentication. NxFilter supports various methods, including full Active Directory integration.
NxFilter Installation and Setup Guide
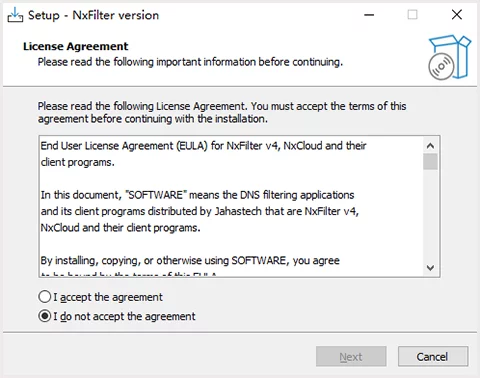
1. Download and run the NxFilter installer. When the following window appears, click [Next].
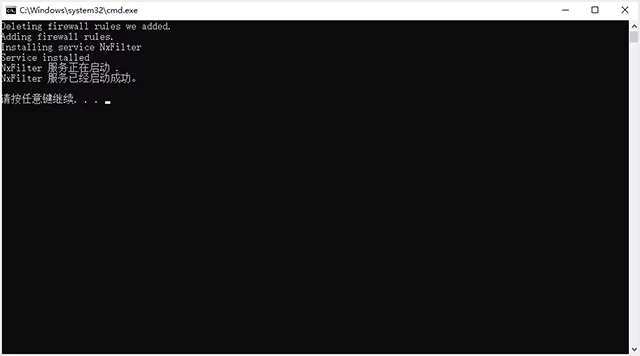
2. After the installer finishes its steps, you will see the interface below indicating a successful installation.
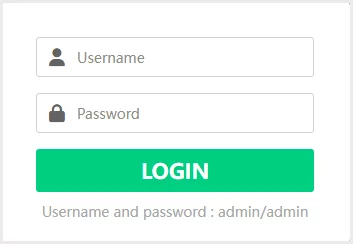
3. To access the admin GUI, open your browser and type "http://localhost/admin" in the address bar. If you created a desktop icon during installation, you can simply click it. If the login screen appears as shown below, your NxFilter is up and running. The initial login and password are "admin" and "admin".
Software Highlights
1. Local DNS caching to speed up your internet connection.
2. User authentication across your network.
3. Multiple filtering policies based on users and groups.
4. IP or IP-range based authentication.
5. Active Directory integration or Single Sign-On (SSO).
6. 802.1X Wi-Fi authentication for mobile devices.
7. Active Directory integration via the cloud.
8. Relay server support to identify users behind a router.
9. Create users and groups directly within the graphic interface.
10. Set data caps for users to save bandwidth.
11. Set "screen time" limits for your users.
12. Detailed reports including usernames.
13. Network-level "Safe Search" enforcement.
14. Remote filtering clients.
15. Sub-admin accounts with limited roles.
FAQ
1. How do I force users to go through NxFilter?
If you have a firewall, this is simple. Block all outbound UDP/53 and TCP/53 traffic except for traffic coming from NxFilter. Then, use DHCP to set NxFilter as the primary DNS server for your network. NxFilter then becomes the only DNS server users can access.
2. How do I reset the admin password?
Use the /nxfilter/bin/reset-pw.sh script. Once run, the admin username and password will reset to "admin". You need to run the script while NxFilter is active.
3. Can I bind NxFilter to a specific IP address?
Yes, to avoid port conflicts, you can use the LISTEN_IP parameter in the /nxfilter/conf/cfg.properties file. Setting it to "0.0.0.0" makes it listen on all addresses, while a specific IP makes it listen only on that one.
4. How do I enable debugging?
Check the system logs in the /nxfilter/log directory. If you need more detail, change "INFO" to "DEBUG" in the /nxfilter/conf/log4j.properties file and restart the software.
5. How do I hide SSL warnings?
When a site is blocked over HTTPS, you usually get an SSL warning instead of a block page to prevent "man-in-the-middle" attacks. If this is annoying, enable the "Silent Block" option in System Settings. This way, the browser will simply show a connection error or a generic failure instead of a warning page.