In professional photography, RAW files are the foundation of editing because they contain complete image data. However, every camera brand uses its own specific RAW format, which often causes compatibility headaches. Adobe DNG Converter v17.5.1 is a free professional tool that acts as a "format translator." By converting various RAW files into a standardized open format, it builds a bridge between your new camera and your existing editing software.
Core Value: Solving Compatibility with Open Standards
The biggest advantage of the DNG (Digital Negative) format is that it is "open." While camera manufacturers use closed, proprietary RAW formats that old software might not recognize, DNG is a universal standard created by Adobe. This tool solves the common industry problem where an older version of Photoshop cannot open files from a brand-new camera model.
This version supports a massive range of brands, including Canon, Nikon, and Sony. It also adds support for the latest models from Hasselblad, Fujifilm, Ricoh, Samsung, and more, covering over 700 different digital cameras. During conversion, the tool keeps all the original image data—such as exposure settings, white balance, and color info—ensuring your editing flexibility remains perfect.
Upgraded Features: Balancing Speed and Control
Adobe DNG Converter v17.5.1 is designed to be both powerful and easy to use. Its batch processing feature allows you to handle an entire folder of photos with just one click. Even a total beginner can finish the task in three simple steps: select the source folder, choose where to save the files, and click "Convert."
For pros, the settings are highly detailed. You can choose between lossless or lossy compression—DNG files are often smaller than the original RAW files while maintaining high quality. You can also customize how files are named, add metadata tags, or even embed the original RAW file inside the DNG as a backup. These options are easy to find in the "Preferences" panel.
Usage Scenarios: Connecting the Creative Workflow
As a key part of the Adobe ecosystem, this tool connects your shoot to your final edit. If you use an older version of Photoshop or Lightroom, you don't need to buy a software upgrade just to use a new camera; simply convert your files to DNG first. These files then work perfectly with modern tools like Adobe Camera Raw for features like "Generative Remove" or "AI Noise Reduction."
It is also essential for professional studios. Whether you are dealing with DNG sequences from a drone, RAW footage from a cinema camera, or still photos from a DSLR, converting everything to a unified format makes team sharing much easier. Because DNG is an open standard, your files will remain readable for years to come, without depending on specific camera manufacturers' software.
The Experience: Free and High-Performance
Adobe DNG Converter v17.5.1 remains completely free with no hidden fees or locked features. The interface is clean and straightforward, avoiding confusing menus. The conversion engine is highly optimized to handle high-resolution files quickly and is fully compatible with both Windows and macOS, including the latest Apple M-series chips.
In a world where RAW formats are becoming more complex, Adobe DNG Converter serves as the "universal key." It is a must-have tool for photographers and studios to protect the long-term value of their images and boost their daily efficiency.
Adobe DNG Converter Instructions
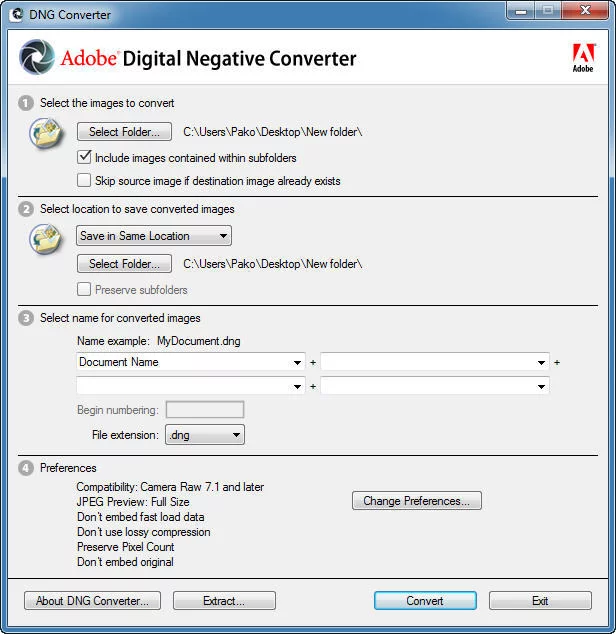
1. Launch the App: Double-click the DNG Converter icon to start the program. Alternatively, you can drag and drop specific images or an entire folder directly onto the Adobe DNG Converter icon to launch it automatically with those files pre-selected.
2. Select Source: Choose the folder containing the RAW images you want to convert into DNG format.
3. Select Destination: Choose the location where you want the converted DNG files to be saved.
4. Choose a Naming Pattern: Select how you want your new DNG files to be named:
Document Name: Uses the existing filename but changes the extension to .dng.
Add Serial Numbers or Letters: An advanced mode that lets you add sequences; a preview of the new filename will be shown next to the naming example.
5. Adjust Additional Naming Settings:
Starting Number: If you want your sequence to start with a number other than 1, enter your preferred starting number here.
File Extension: The extension is automatically set to .dng. You can choose whether you want the letters "DNG" to appear in uppercase or lowercase.
6. Check Compatibility: If necessary, change your "Compatibility" preferences (e.g., if you need the files to work with much older versions of Photoshop).
7. Start Conversion: Click "Convert." A dialog box will appear to show you the progress of the conversion.