How to Convert MKV to MP4 Using HandBrake (Step-by-Step Guide)
Before We Start: Why I Wrote This Guide
Converting MKV to MP4 is something I was forced to learn early on. At the time, I downloaded a movie from the web in MKV format – great quality, multiple audio tracks and subtitles. But when I copied it to my TV – it wouldn't play. Tried it on my phone – still no luck. Later I realised that while MKV is a powerful container, many devices just don't handle it well. Back then I didn't know the difference between container formats and codecs – I just knew I needed that file to play on my TV. After a bit of trial and error, HandBrake turned out to be the tool I got along with best.
This guide collects the workflow I worked out through that process, from installation to exporting your first MP4, with each step explained clearly so even first‑timers can follow along.
Step 1: Download and Install HandBrake
HandBrake is a free and open‑source video transcoder that supports Windows, macOS, and Linux. Head to the official website handbrake.fr and download the version for your system. Windows users grab the .exe installer, macOS users the .dmg file, and Linux users can install via sudo apt install handbrake. The installation is straightforward – just click "Next" all the way.
Step 2: Why Convert MKV to MP4?
Before we get started, I think it's worth explaining why you'd want to do this conversion. MKV (Matroska Video) and MP4 (MPEG‑4 Part 14) are both common video container formats. MKV's strength is its flexibility – it can hold multiple audio tracks, subtitles, chapters, and more, which is why many high‑quality releases use it. The downside? Many devices – like smart TVs, game consoles, phones, and even some video editing software – have poor support for MKV.
MP4, on the other hand, is widely compatible. Almost every device can play MP4, uploading to video platforms is hassle‑free, and the file size is often smaller than MKV. If you're stuck with an MKV file that won't play on your device, converting it to MP4 is the simplest fix.
Step 3: Import Your MKV File
Once you open HandBrake, click the "Open File" button in the upper‑left corner and select your MKV file. You can also simply drag and drop the file into the HandBrake window – both methods work. After importing, the software automatically reads the video's basic information – resolution, frame rate, duration – and also detects the audio tracks and subtitle tracks embedded in the file.
Step 4: Set Output Format to MP4
In the "Output Settings" section of the main interface, select MP4 as the format. HandBrake's default output format is often MP4 already – if not, just change it manually. One small detail to watch: if the exported file ends up with a .m4v extension, you can uncheck options like "Use iPod / iPhone compatibility" in the settings, and it will revert to .mp4.
Step 5: Recommended Video Settings
This is where many people get stuck – how to balance quality and file size. Here's what I've found works best.
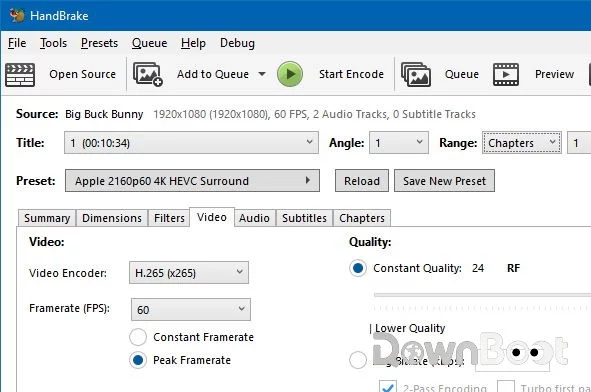
Video Encoder: I recommend H.264 (x264). The reason is simple – it has the best compatibility with virtually every device. If you're on newer hardware, you could try H.265 (x265) – it gives smaller files at similar quality, but encoding takes longer.
Quality (RF Value): HandBrake uses a Constant Quality parameter (RF). Lower values mean better quality and larger files. I generally recommend RF 18‑22 – 18 is near‑lossless, 22 reduces file size noticeably while keeping quality acceptable. For everyday viewing, RF 20 is a solid middle ground.
Frame Rate: Select "Same as source" – keep it identical to the original. Don't change it randomly; lowering it makes video choppy, and raising it only increases file size without real quality gain.
Resolution: If unsure, keep the original resolution. In the "Dimensions" tab you can disable the resolution limit to prevent automatic scaling.
Step 6: Audio Settings
Audio is relatively simple. Choose AAC as the encoder and set the bitrate to 160‑192 kbps – that's more than enough. If the source has multiple audio tracks, you can select which ones to keep in the "Audio" tab, or keep all of them.
Step 7: How to Keep Subtitles
MKV files often have embedded subtitles – and if you're not careful, they can be lost during conversion. In the "Subtitles" tab, check that the subtitle track you need is selected. If you have external subtitle files like .srt or .ass, you can also add them manually here.
Step 8: Choose Output Path and Start Conversion
In the "Save As" field, specify where you want the converted MP4 to be saved. I'd suggest avoiding the C drive to prevent filling up your system partition. Once everything looks correct, click the "Start Encode" button at the top.
Conversion time depends on video length, resolution, and your hardware. A 120‑minute 1080p video with the "veryfast" preset usually takes around half an hour. 4K videos or H.265 encoding will take longer.
Step 9: Check the Result
After conversion finishes, go to the output folder and open the new MP4 file with a media player. Check three key things: any visual artefacts, whether audio is in sync, and whether subtitles appear correctly. If something's off, go back to HandBrake, adjust the relevant settings, and re‑encode.
Troubleshooting Common Issues
The output file is too large. The RF value might be too low (e.g., below 15). Try increasing it to 22 or 24 – the file will shrink significantly.
Video quality has dropped. The RF value might be too high (e.g., above 28). Lower it to around 20 and try again.
Subtitles are missing. Check that the subtitle track is selected in the "Subtitles" tab. If using external subtitle files, verify the file path is correct.
Conversion is too slow. If using H.265, switching to H.264 will speed things up a lot. Also, in the "Video" tab, changing the encoder speed preset from "Slow" to "VeryFast" can help.
The output is .m4v instead of .mp4. In HandBrake's preferences, uncheck options related to "Use iPod / iPhone compatibility".
HandBrake vs FFmpeg: Which One to Choose?
If you're a beginner and just want to convert MKV to MP4 quickly, HandBrake is the better choice – it has a graphical interface, intuitive controls, and presets to guide you. If you need batch processing, script automation, or very fine control over encoding parameters, FFmpeg is more powerful. They serve different purposes and don't conflict – you can keep both installed.
Final Words
HandBrake can do much more than just MKV to MP4 – it can also compress videos, adjust encoding parameters, and extract audio or subtitles. But for most users, mastering the steps above is already more than enough. From installation to your first MP4 export, the whole process takes less than ten minutes. If you run into any issues not covered here, HandBrake's official documentation and community forums are the best places to look for help.